

How To Export A Photo From Photoshop To Lightroom
Possibly yous just opened an image from Lightroom into Photoshop, only your Photoshop edits aren't being saved dorsum in Lightroom. Or perhaps you started working in Photoshop and realized y'all desire to bring your project over into Lightroom and feel like you're besides far gone. Luckily, information technology's easy to export any paradigm from Photoshop to Lightroom with this simple process.
To export a photo from Photoshop to Lightroom, go to File > Salvage A Copy in Photoshop. Salve your image as a TIFF file and prepare the export location to a folder that is already imported in Lightroom. In Lightroom, click Import and select the folder that you exported the file to bring it into Lightroom.
Now, this might seem like a roundabout way of doing things, just you'll learn why this is the only way later in the mail. After that, you'll discover a more than streamlined way to open up your Lightroom files in Photoshop (and vice versa), so you can use both apps to bring your vision to life.
Permit's become started!
How To Consign From Photoshop To Lightroom
Let's say you lot started editing your projection in Photoshop, and your image has never touched Lightroom yet. In that example, the best plan of attack is to save your Photoshop file to an existing Lightroom folder, then import it into Lightroom.
Step 1: In Photoshop, Go To File > Relieve A Copy
After you've finished working on your file in Photoshop, click File in the Bill of fare Bar, so click Salve a copy. In older versions of Photoshop, just click "Relieve As."
This will allow you to save your file in the format you want to later be imported into Lightroom. Alternatively, you tin use the Save a Copy feature past using the shortcut Alt + Control + South on Windows or Alt + Command + Due south on Mac.


Step 2: Set Your Export Location To A Previously Imported Lightroom Binder
When y'all're exporting your file from Photoshop, don't salvage it in a random folder. Instead, save it in a designated folder that you lot're already using in Lightroom. This way, information technology'due south easier to discover the photo y'all need to import into Lightroom to go on your editing. For this tutorial, a folder named Ps to Lr was used.

Step 3: Cull An Export Format And Export From Photoshop
Additionally, while you tin can salvage your photo in whatsoever format, it's practiced to save it in the TIFF format. This is because TIFF retains the nigh photo data, which works swell for editing RAWs. However, as mentioned, this tutorial works for only about any photograph format.
To select the TIFF format, click the Salve equally type field. This will reveal a dropdown menu with a listing of file types to cull from, TIFF will be at the bottom of that list. Later on you select TIFF, a popup window will appear in Photoshop showing you the settings for saving a TIFF file. Everything that you need will be automatically checked, so simply click okay to salvage your prototype as a TIFF file.


Stride 4: Open Lightroom
One time you lot've saved your paradigm, open Lightroom on your desktop to begin importing your image. Although I am using Lightroom CC, these same steps utilise to Lightroom Archetype.

Step five: Go To File > Import Photos And Video
To brainstorm importing your photograph, click the Add together Photos push on the left-hand side of your screen, below the Menu Bar. Lightroom allows you to import multiple files at once, just for this tutorial, only one file will be used.
If you don't want to employ the Add Photos push button, you can also employ the import shortcut Control + Shift + I on Windows or Command + Shift + I on Mac to import your photos.

Step six: Locate The Folder Your Photoshop Consign Was Saved
After you've clicked the Add Photos button, a popup window will announced, so y'all can scan for your Photoshop consign. Open up the binder you saved the paradigm in past double-clicking information technology or click it and then click the Review for Import button to open it
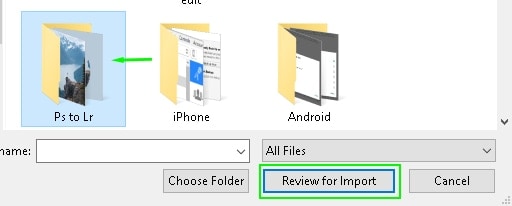
Once you lot've opened the binder, select your prototype, and so click Review for Import again to brainstorm loading it into Lightroom.

Step 7: Click Import
Afterwards you've loaded it into Lightroom for review before completing the import process, ensure the photograph is selected with a tick on the box. Also, cheque at the acme of the window to make sure that your imported photo is not added to an album. You lot tin confirm this by checking where it says "Add together to Album" and being sure that "None" is abreast information technology.
Afterward, click the Add 10 Photo (Ten existence the placeholder for the number of photos you lot accept selected) to load information technology into Lightroom for further editing.

You've Exported From Photoshop To Lightroom!
After you lot've imported your photo into Lightroom, you will see it appear in the film strip at the bottom. Simply click on it to enlarge information technology and begin working on it. If you're new to editing photos in Lightroom, this post will get you lot up to speed!

How to Open Lightroom Files Into Photoshop
When you lot're finished editing your paradigm in Lightroom, y'all don't have to save it and then reopen it in Photoshop. Yous tin can easily export it dorsum to Photoshop for further editing.
Kickoff, right-click on the epitome and then click "Edit in Photoshop."
Lightroom volition then open up the prototype in Photoshop, so y'all can keep working on information technology. Even if you don't have Photoshop open, this function will automatically kickoff Photoshop and load the epitome.
Alternatively, if you want to speed up your workflow, you can employ the Edit in Photoshop shortcut, which is Control + Shift + East on Windows or Command + Shift + Due east on Mac.

If you saved the file as TIFF (equally mentioned before) or PSD then when you utilise the Edit in Photoshop role in Lightroom, you'll accept admission to all the layers in Photoshop. This ways you can go back and make corrections to any layers you may have created prior to exporting your photo from Photoshop to Lightroom.
Once yous're done editing your photo in Photoshop, you don't demand to export information technology again if you need to do further editing in Lightroom. Yous can just use the Save as function to update your existing file over in Lightroom.
You can access the Salvage equally office by clicking File > Save as. If you want to relieve time, yous tin can employ the shortcut, Shift + Control + S on Windows or Shift + Control + South on Mac.
This will relieve the changes made in Photoshop and update the file in Lightroom without any boosted importing. This just works because we started by choosing the "Edit In Photoshop" option inside of Lightroom. This really streamlines your workflow when you need to work betwixt the two programs.

As you tin can come across, exporting from Photoshop to Lightroom is a quick and easy process. And you tin can likewise open up Lightroom files in Photoshop with ease too. Both apps work great together, which allows y'all to spend less time bouncing betwixt the ii and more time bringing your visions to life. To assist you get a amend understanding of the uses of each program and when to use them, see exactly why you should apply Photoshop or Lightroom!
Happy Editing!
Source: https://www.bwillcreative.com/how-to-export-images-from-photoshop-to-lightroom/
Posted by: churchillgraters.blogspot.com
0 Response to "How To Export A Photo From Photoshop To Lightroom"
Post a Comment